In today’s fast-paced online world, website speed is a game-changer when it comes to user experience and SEO rankings. If your website is slow to load, you’re not just frustrating visitors — you’re also losing traffic and damaging your search engine rankings. But here’s the good news: one of the most effective ways to improve your website speed is by using a Content Delivery Network (CDN). Setting up a CDN can seriously boost your site’s performance, reduce latency, and make your website more reliable for users, no matter where they are in the world. In this guide, I’m going to walk you through the process of setting up a CDN for your website. I’ll explain why a CDN is essential, show you the benefits it brings, and how to set up cdn for website. Whether you’re running a WordPress site or a custom-built one, I’ve got you covered with everything you need to get started with a CDN. So let’s dive in!
Why Use a CDN for Your Website?
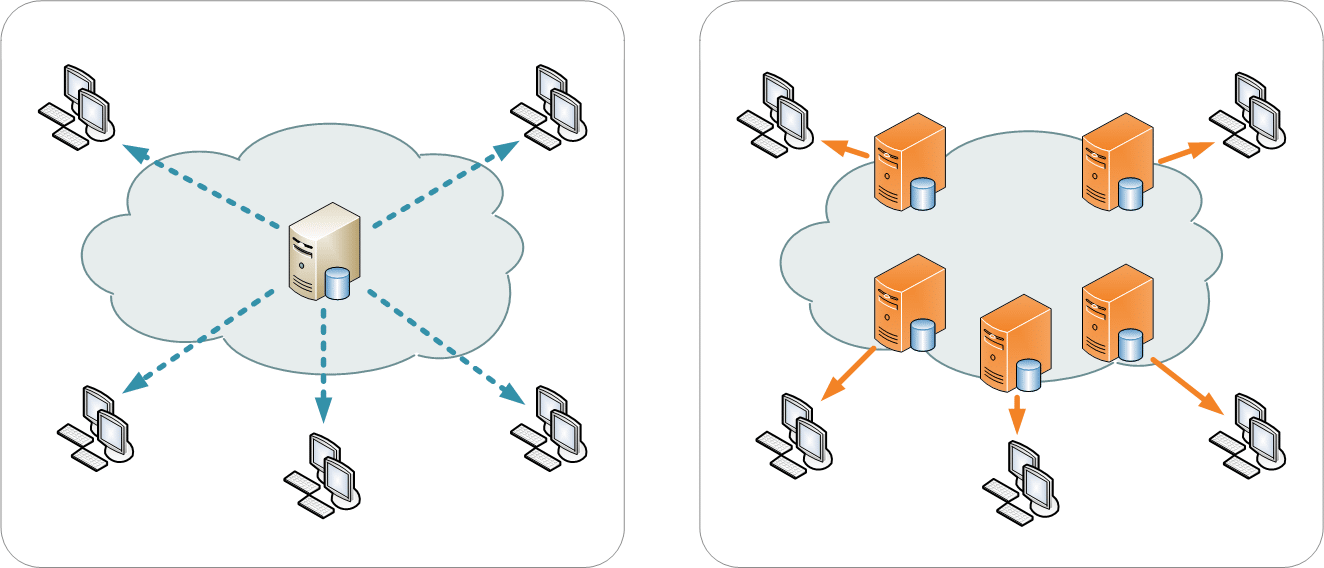
Before diving into the setup process, let’s quickly go over why using a CDN is crucial for your website’s performance. A CDN is a network of servers distributed across different geographical locations. When a user accesses your website, the CDN delivers the content from the nearest server, reducing the time it takes for the data to travel across the globe.
Some of the benefits of using a CDN for website speed include:
- Faster Load Times: The CDN caches static content like images, CSS, and JavaScript files and delivers them from the closest server to the user.
- Reduced Latency: Since the content is served from multiple servers, latency is minimized, resulting in a faster and more responsive website.
- Improved Performance: CDNs optimize the delivery of your content, especially during traffic spikes, ensuring that your website runs smoothly.
- Lower Bandwidth Costs: By caching content and reducing the load on your origin server, CDNs help reduce bandwidth costs.
- Increased Reliability: CDNs provide redundancy by using multiple servers, ensuring your site stays online even if one server goes down.
Now that you understand why you need a CDN, let’s go through the steps on how to set it up for your website.
How to Set Up CDN for Website?

Credit: linuxscriptshub.com
Setting up a CDN for your website isn’t as complicated as it might sound. Whether you’re using a popular CDN like Cloudflare or another provider, the basic process is similar. Let’s break it down into easy-to-follow steps:
Step 1: Choose the Right CDN Provider
The first step in setting up a CDN for your website is choosing the right CDN provider. There are several options available, and the one you choose depends on your website’s needs. Some of the most popular CDN providers include:
- Cloudflare CDN: Cloudflare is one of the best CDN providers for website speed. It’s known for its user-friendly setup, strong security features, and reliable performance. Cloudflare offers both free and premium CDN plans.
- Amazon CloudFront: If you’re looking for a more customizable and enterprise-level solution, Amazon CloudFront offers great scalability and is integrated with AWS.
- KeyCDN: A great choice for those looking for an affordable CDN with good performance and ease of use.
Step 2: Sign Up and Create an Account
Once you’ve chosen your CDN provider, sign up for an account. For example, if you’re setting up Cloudflare CDN, the sign-up process is simple and straightforward. Just go to the Cloudflare website and click on the “Sign Up” button.
Step 3: Add Your Website to the CDN Provider
After signing up, the next step is to add your website to the CDN platform. Here’s how you can do it:
- Log into your CDN dashboard.
- Add your website URL to the CDN platform.
- The CDN provider will scan your website’s DNS records to fetch the necessary information.
For Cloudflare, you’ll enter your website’s domain, and Cloudflare will automatically detect your DNS settings.
Step 4: Update Your DNS Settings
Once the CDN provider has scanned your DNS records, you’ll need to update your domain’s DNS settings to point to the CDN. This is where CDN DNS setup comes in.
- Log into your domain registrar’s control panel. (For example, GoDaddy, Namecheap, etc.)
- Change the nameservers provided by your CDN to your domain registrar’s DNS settings.
This step ensures that all traffic to your website is routed through the CDN, allowing it to cache and deliver content efficiently. It typically takes anywhere from a few minutes to 24 hours for DNS changes to propagate globally.
If you’re using Cloudflare, you’ll simply copy the nameservers that Cloudflare provides and paste them into your domain registrar’s DNS settings.
Step 5: Configure Your CDN Settings
After updating your DNS settings, the next step is to configure your CDN. This includes setting up caching rules, SSL certificates, and security features. Most CDN platforms, including Cloudflare, offer easy-to-follow instructions for configuring these settings.
Some essential settings to configure include:
- Caching Rules: Decide what content you want the CDN to cache. Generally, you’ll want to cache static content like images, stylesheets, and scripts.
- SSL Configuration: Make sure to enable SSL if your website uses HTTPS. Cloudflare, for example, provides free SSL certificates to ensure secure connections.
- Page Rules (Cloudflare): In Cloudflare, you can set up page rules to fine-tune caching for specific pages of your website.
You can explore more options and CDN plans on IgnisHost’s CDN Plans.
Step 6: Test Your CDN Setup
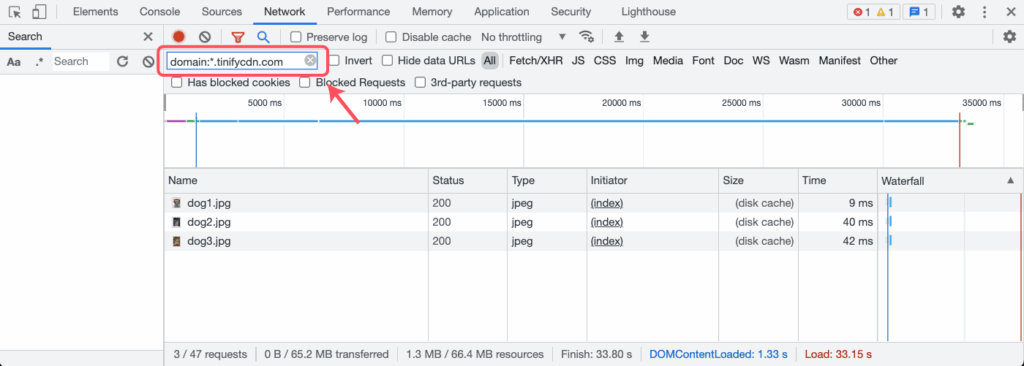
Credit: tinify.com
Once everything is configured, it’s time to test whether the CDN is working properly. You can do this by checking the response headers on your website.
- Right-click on your website and select “Inspect.”
- Go to the Network tab and refresh the page.
- Check the response headers to see if they include information from the CDN, such as “CF-Cache-Status” for Cloudflare.
If the CDN is properly set up, you should see content being served from the CDN, and your site should load much faster.
Step 7: Monitor and Optimize
Once the CDN is up and running, it’s important to regularly monitor your website’s performance. Most CDN providers, like Cloudflare, offer analytics that allow you to track the speed of your website, cache hit rates, and overall performance.
Additionally, if you’re using WordPress, there are plugins like W3 Total Cache or WP Rocket that integrate well with CDNs, helping to further optimize your website’s speed and performance.
FAQ’s
Here’s a quick look at some of the most frequently asked questions about setting up a CDN for your website.
What is a CDN and why should I set one up?
A CDN (Content Delivery Network) speeds up your website by caching content across multiple servers globally. It improves site performance by reducing load times and enhancing user experience.
Can I set up a CDN for my WordPress website?
Yes! Setting up a CDN for WordPress is easy. Many CDN providers like Cloudflare offer direct integrations with WordPress to optimize site speed.
How does Cloudflare CDN improve my website’s speed?
Cloudflare caches your website’s content on servers around the world, ensuring faster delivery to users no matter where they are. It reduces latency and load times, improving overall user experience.
Can I use a CDN with dynamic content?
While CDNs are great for static content, modern CDNs like Cloudflare also handle dynamic content efficiently by optimizing routing and reducing latency.
How do I know if my CDN setup is working?
You can check the response headers of your site to see if the CDN is serving content. Look for CDN-specific headers, like “CF-Cache-Status” in Cloudflare.
The Bottom Line
Setting up a CDN for your website is one of the best decisions you can make to improve website speed, performance, and overall user experience. With the right CDN provider, you can deliver faster load times, reduce latency, and even lower your bandwidth costs. Whether you’re using Cloudflare CDN setup or configuring your WordPress CDN, the steps are easy to follow, and the benefits of CDN are undeniable.
Remember to monitor your site’s performance and make any necessary adjustments to optimize your CDN setup. By setting up a CDN, you’ll be well on your way to providing a better, faster experience for your website visitors.